As the Pittenweem Arts Festival comes to an end, we've been inspired to get more creative and want to encourage you to get your creative juices flowing too! So here’s a little tutorial on how to use Scaramanga’s
wooden printing blocks to make your own personalized wrapping paper.
Your friends and family will always appreciate something that’s been hand crafted with love and care, plus you can really enjoy making it- everybody wins! You can customise your paper for whoever you want to give it to – so if your mum just loves elephants and you can’t find the perfect paper, get an elephant printing block and make it! And don’t think this is an indoor-only craft – get outside, get inspired and find something unique to include in your gift wrapping!
I took a walk along the coastal path from Pittenweem to Anstruther looking for some creative inspiration... and I found it!

This tiny little beach is just overrun with hundreds of shells! People traversing the coastal path have climbed down the bank to write their names out in shells (which, of course, I did too!) and it’s really beautiful!
Shells are widely used as symbols for strength, infinity or truth. They’re used as musical instruments and accessories across the world... I could go on, I love them! Shells really are the ultimate crafting partner.
With a bag full of shells and driftwood taken from the beach, I was inspired to do some printing and decorating with a sea theme. So, let’s get on with the crafting!
What you’ll need:
- Your selection of Scaramanga printing blocks
- Paint or ink and water for rinsing
- A paintbrush (this is important if you’re using paint from a tube like me since you need to spread it out!)
- Scissors
- Plain paper (I'm using brown Kraft paper)
- Pencil and a ruler or tape measure (optional)
 You’ll also want:
- Decorations! Here’s some ideas
 Step 1:
 Practice some printing before you begin so you know exactly what it will look like and what kind of design you want to go for
 Step 2:
 Lay out your paper on a flat surface and cut out how much you’ll need, just like you would with shop bought paper!
 Step 3:
 With a pencil and a ruler, measure where you want your prints to go and lightly pencil in some guidelines. I’m going for strips so I want each one to be separated neatly so there’s no random spacing or prints coming too close together! Now, if your design is a little haphazard, or you do not want a uniform print, or you’re just very confident with your placement then you don’t
need to do this - but I recommend it!
 Step 4:
 press your printing block into a thin layer of paint or ink. It’s important that you’re not using too much paint and that it’s not too thick otherwise it will smother the lines of the block and your print won’t come out very clear! This is why you really should
practice with the blocks before you begin!
 Step 5:
 Transfer the block onto your cut out paper! Press down lightly and make sure you keep your hand steady and
hold the paper down when you lift the block up otherwise it might smudge!
 Step 6:
 Keep going! Depending on how thick your paint is, you might get two or three clear prints out before having to dip the block into the paint again – this is why practising first is important!

If you’re using more than one printing block in your design, as I am, then how you proceed is up to you! You might want to print out one all over the paper before adding the next one in between or you might want to go back and forth.
Personally, I’m printing out the fish in one strip and then I’m adding in my other blocks and proceeding one line at a time.

I've chosen this little fish block for my sea theme but I love colour so I’m also adding in some sea-weed looking plants!
Step 7: Take a step back and admire your completed wrapping paper!

Don’t get upset if some of your prints don’t come out perfectly; if one is a little smudged or another isn’t as clear as the others. Each mistake is as beautiful as every clear print because that’s what shows that you’ve
made this and spent time and energy into doing this by hand! Trust me, not only will it be greatly appreciated, you’ll also get a real feeling of satisfaction!
Step 8: Leave your paper to dry overnight or for a few hours before wrapping up your presents!
Step 9: Get decorating! This can be absolutely anything; a simple ribbon, some flowers. Maybe your paper doesn’t need any embellishments - but it is fun! I’ve gone for a blue ribbon to match the fish and a shell and driftwood from the beach!

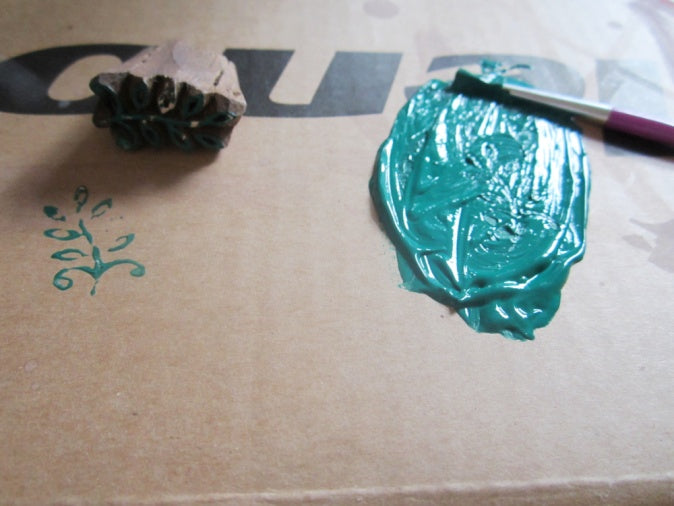
I’ve also made a gift tag in the style of a wax seal by adding a circle of paint and pressing the block in it!
 Tips!
Tips!
- If you’re using the same printing block but with different colours then always leave it to dry and give it a wipe down between colour changes!
- If you get some build up of paint in your printing block then try and pick it out with the end of your paintbrush or with a pin so the lines are always clearly defined!
Happy crafting everyone! If you have any helpful tips about using our printing blocks then share them in the comments! :)

Visit our website to get your own printing blocks! http://www.scaramangashop.co.uk/journals-albums/printing-blocks/cat_63.html

 I’ve also made a gift tag in the style of a wax seal by adding a circle of paint and pressing the block in it!
 Visit our website to get your own printing blocks! http://www.scaramangashop.co.uk/journals-albums/printing-blocks/cat_63.html


